


Creating models in Deep Learning is fun. But more fun is to make it available for laymen to use it. How can we achieve that? Well, there are many ways to do it. In this blog we will see one of the method.
Let’s break down the problem into smaller tasks :
- Export trained model in .pkl format.
- Create virtual Env and download all dependencies.
- Set a proper folder structure.
- Connect .html, .js, .py file together aka. create a working local web app.
- Now that your app is running perfectly you can dance, showoff, or just go out and relax.
Task 1: Export trained model in .pkl format
Assuming that you have trained your model. Will we export the model locally.
To export your model in .pkl format just execute the below line of code in your jupyter notebook.
model.export('path'+'/model.pkl') # Change path according to your need
Task 2: Create virtual Env and download all dependencies
To create a virtual env you can use conda or pip venv.
Just make sure to install dependencies mentions below inside the virtual environment:
python==3.7
fastai==1.0.52
torch==1.5.1+cpu
flask
Now could install torch vision explicitly or it will automatically be installed with fastai and torch.
Task 3: Set up a proper folder structure.
Structuring file is super important for Flask web apps.
Our folder structure will be something like this:
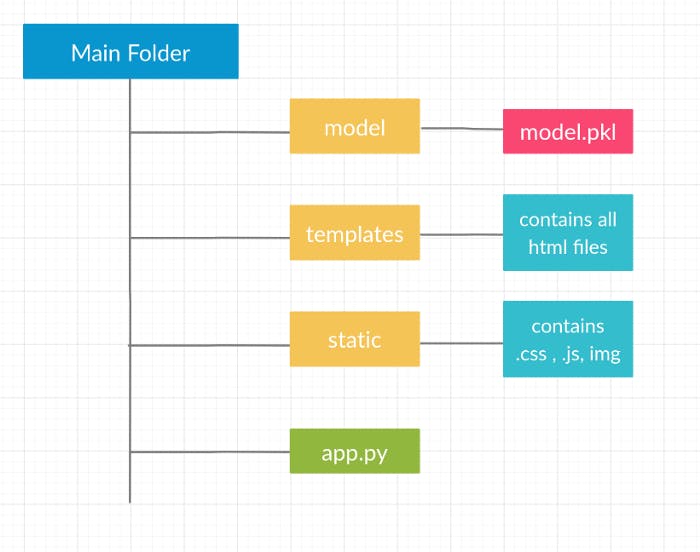
It is very important to have templates and static folder (both case-sensitive)
Task 4: Connect .html, .js, .py file together aka. create a working local web app
-app.py will be our main flask file
- .html will be the file which we will render in the browser
- .js file will be used to send asynchronously data to app.py
Let’s get started with app.py:
# Importing Necessary packages
from flask import Flask,render_template, request, jsonify
import numpy as np
from fastai.vision import *
import pickle
import io

# setting working dir
cwd = os.getcwd()
path= cwd + '/model'

# Initialiazing flask app
app = Flask(__name__)

# Loading  saved model
model = load_learner(path, 'model.pkl')

# Rendering index.html at /
@app.route('/')
def index():
    return render_template('index.html')

# Getting data with POST Method
@app.route('/upload', methods=["POST"])
def upload():
    # try:
        # Getting img from POST
        file = request.files['user-img'].read()
        # Resizing img to 224 X 224 , This is the size on which model was trained
        img = open_image(io.BytesIO(file))
        # Prediction using model
        prediction = model.predict(img)[0]

        # Getting Prediction ready to sent it to frontend
        response = {"result": str(prediction)}
        return jsonify(response)

#running app at localhost on port 8080
if __name__ == '__main__':
    app.run(host='0.0.0.0', port=8080)
Let’s move to the index.html file:
This will be the file which the user will see and interact with. For styling will use the CSS file. You can design an HTML file according to your need.
You can get a sample project on Github at: github.com/tapan2930/pokemon-dl which is deployed at pokemon-dl.azurewebsites.net
Now we will deal with javascript file:
JavaScript file will be used to asynchronously send and get data from flask server (app.py file)
Asynchronous js basically means to send and get data from the server without reloading a page.
Here, we can use AJAX or for modern methods like fetch which all modern browser supports. (Here, will be using fetch method).
myForm.addEventListener("submit", e =>{
  e.preventDefault();
  const endpoint = "/upload";
  formData = new FormData();
  formData.append('user-img', inpImg.files[0]);

  fetch(endpoint, {
    method: "post",
    body: formData
  }).then(
    response => response.json()
  ).then(
      (data) => {
          document.getElementById("result").innerHTML = data["result"]
      }
  );

});
Task 4.1: Setting things ready:
Now, as our all files are ready we will open our terminal on our main folder(the folder where our app.py is located) and right command:
Make sure you have activated your virtual env.
python app.py
It will fire up our flask app and display output something like this:

Now open the URL given in the terminal and you will be able to see your flask app running locally.
Bonus:
Now that you have local working flask app. Next step is to deploy it.
For deploying an app with some ml stuff going on then your best bet is docker container.
If you have never heard of docker then, it is basically taking a virtual environment things to the next level. In simple words, you wrap everything from O.S, your files, dependencies, and instructions to run certain commands in an imaginary box. If want to know more about docker, here a super amazing docker playlist on YouTube 👉Here